How To Organize Multiple Windows On Mac: 7 Smart Ways

If your Mac screen turns into a pile of overlapping windows by lunch, the problem is not your focus. It is your setup. Once I learned how to organize multiple windows on Mac, switching between research, writing, email, Finder, and browser tabs stopped feeling like digital hide-and-seek.
The best part is that you do not need to install anything first. macOS already gives you window snapping, Split View, Mission Control, Spaces, Stage Manager, and fast keyboard shortcuts. The trick is knowing which feature to use for each type of work.
Why Your Mac Feels Messy With Too Many Windows Open
Most Mac users treat every window the same way. They drag apps around, resize them by hand, minimize a few, lose one behind another, then open Mission Control in panic. I used to work like that too, especially when writing with Safari, Notes, Finder, Slack, and Preview open at once.
The better approach is to assign each tool a job. Window snapping is best for quick layouts. Split View is best for two-app focus. Mission Control helps you find what is already open. Spaces separate different projects. Stage Manager keeps active work centered while other apps stay nearby.
That workflow-first approach gives your desktop structure instead of clutter.
Start With Built-In Window Snapping on macOS
Modern macOS versions make window tiling much easier than older releases. You can move windows into halves, corners, and arranged layouts without manually resizing everything.
How to Snap Windows by Dragging
Click a window’s title bar and drag it toward the edge or corner of your screen. When macOS shows a faint layout preview, release the window. Dragging to the left or right edge usually creates a half-screen layout. Dragging toward corners helps build a quarter-screen setup.
This is the fastest method when I am comparing two browser windows, checking a document beside an email, or moving Finder next to a writing app.
How to Use the Green Button Move & Resize Menu
The green button in the top-left corner of a Mac window does more than make apps full screen. Hover over it, then choose a layout under Move & Resize. You can move a window to the left half, right half, top, bottom, or corners, depending on your macOS version and app support.
This method feels slower than dragging at first, but it gives better control. I use it when I want clean halves or quarters without guessing where the window will land.
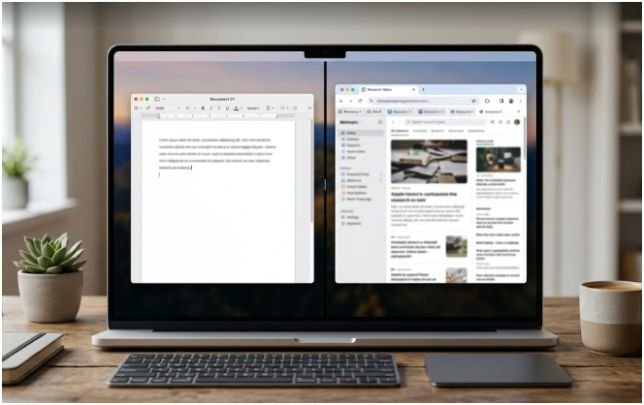
Use Split View When You Need Two Apps Side by Side
Split View is the cleanest option when you want two apps side by side without desktop distractions. It creates a focused full-screen workspace with one app on each side.
To use it, hover over the green button on the first window. Choose the option to place it on the left or right side of the screen. Then select the second app from the windows shown on the other side.
When Split View Works Best
Split View works best for paired tasks. I use it for writing while viewing research, editing a document beside a PDF, comparing two webpages, or taking notes during a video call.
It is not my favorite option for fast switching across many apps. Since Split View creates a full-screen Space, it can feel too locked in for messy multitasking. Use it when you want focus, not when you need constant app hopping.
How to Resize or Exit Split View
Drag the center divider to adjust how much space each app gets. If one app needs more room, give it around two-thirds of the screen.
To exit, move your pointer to the top of the screen, hover over the green button, and leave full screen or move the window back to the desktop.
Use Mission Control to See Every Open Window Fast
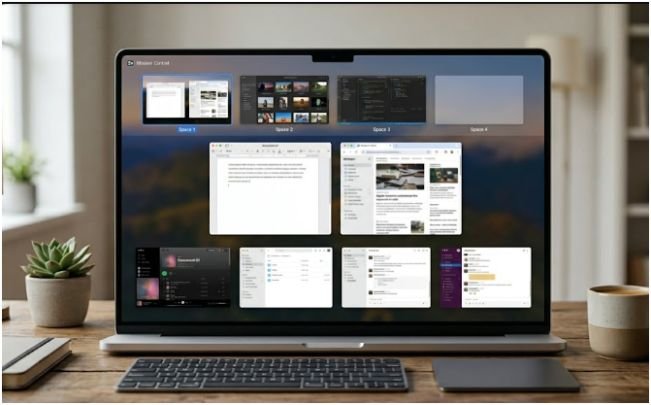
Mission Control shows all open windows and Spaces in one overview. It is one of the most useful tools for anyone learning how to organize multiple windows on Mac because it removes the guessing.
You can open Mission Control by pressing the Mission Control key, usually F3, or by swiping up with three or four fingers on the trackpad. From there, click any window to bring it forward.
How I Use Mission Control During Busy Workdays
My rule is simple: if I cannot find a window in two seconds, I open Mission Control. I do not waste time dragging windows around or clicking every app in the Dock.
Mission Control also helps when several windows belong to the same app. For example, if I have three Safari windows open for research, one Finder window for screenshots, and one Preview window for a PDF, Mission Control makes the layout visible at once.
Create Spaces for Separate Projects and Cleaner Focus
Spaces are virtual desktops. They help when one desktop becomes too crowded. Instead of keeping every window in one place, you can create separate desktops for different tasks.
Open Mission Control, move your pointer to the top of the screen, and click the plus icon to add a new Space. Then drag windows into the Space where they belong. You can switch between Spaces with Control + Left Arrow or Control + Right Arrow. Trackpad users can swipe left or right with three or four fingers.
My Three-Space Setup for Daily Mac Work
My most useful setup has three Spaces. The first Space is for communication, with email, calendar, and chat. The second Space is for production, with my writing app, browser, and notes. The third Space is for files, with Finder, Preview, screenshots, and downloads.
This setup lowers visual noise. It also stops me from checking messages while writing. For most US remote workers, students, and creators, this is more practical than trying to fit everything on one screen.
Use Stage Manager for Task-Based Window Groups
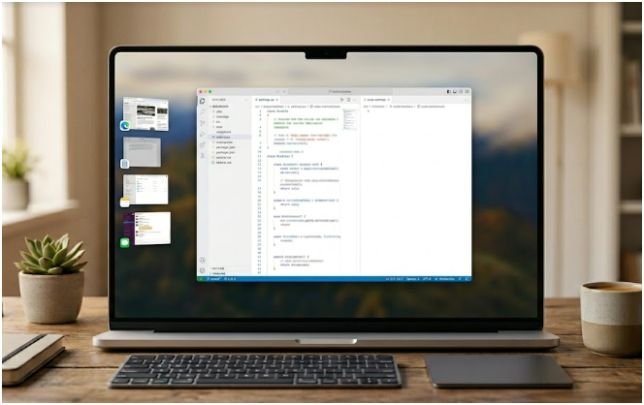
Stage Manager keeps your active window in the center while placing recently used apps on the left side. It works well when you want one main task visible but still need quick access to related apps.
Turn it on from Control Center in the menu bar. Click Stage Manager, then group apps by dragging a window from the left strip into the center.
When Stage Manager Is Better Than Split View
Stage Manager is better when your work needs three or four related apps, not just two. For example, I like it for content work because I can group Safari, Notes, Finder, and an image folder together.
Split View is stricter. Stage Manager feels more flexible. It lets you keep a project cluster without filling the whole desktop with floating windows.
Master the Keyboard Shortcuts That Save the Most Time
Window organization is not only about where windows sit. It is also about how fast you move between them.
Command + Tab switches between open apps. Command + ` switches between windows of the same app. Command + H hides the active app. Command + M minimizes the front window. Control + Arrow keys move between Spaces.
The shortcut I use most is Command + `. It is easy to forget, but it saves time when several browser, Finder, or document windows are open.
Try a Simple Three-Zone Desktop Layout
If you do not want to overthink window management, use a three-zone layout. Keep your main work window in the center or left side. Place reference material on the right. Keep communication tools in another Space or hidden until needed.
For example, when writing, I keep the document on the left two-thirds of the screen and Safari on the right third. Finder stays in a separate Space. Email stays hidden. This layout keeps my attention on the work instead of the inbox.
This is also where the internal topic how to arrange windows on Mac for productivity fits naturally. Organizing windows is not just a visual cleanup task. It changes how often you switch context.
When a Mac Window Arranging App Makes Sense
Built-in macOS tools are enough for most users. But a dedicated Mac window arranging app can help if you manage an ultrawide monitor, external display, or repeat the same layout every day.
A good app can save custom layouts, assign keyboard shortcuts, and move windows into exact positions faster than manual snapping. This is useful for developers, analysts, editors, designers, and anyone who uses the same app combinations daily.
Best Use Case for a Mac Window Arranging App for Productivity
The best window management app for Mac is the one that reduces repeated dragging. If you spend more than a minute arranging windows every time you start work, an app may save real time.
For example, a writer might create a layout with Chrome on the right, Google Docs on the left, Finder below, and Notes beside it. A developer may want code, terminal, browser preview, and documentation in fixed zones.
Common Mistakes That Make Mac Windows Harder to Manage
The biggest mistake is using full screen for everything. Full screen looks clean, but it can hide useful windows and slow down switching.
Another mistake is minimizing too many windows. Minimized windows often become forgotten windows. I prefer hiding apps with Command + H or moving them to another Space.
A third mistake is keeping email or chat visible during deep work. If a window does not support the task in front of you, move it away. Your Mac should show your current priority, not every possible distraction.
FAQs About Organizing Multiple Windows on Mac
1. What is the fastest way to organize multiple windows on Mac?
Use window snapping for quick layouts, Mission Control to find open windows, and Spaces to separate different projects.
2. How do I split my Mac screen between two apps?
Hover over the green button, choose a left or right Split View option, then select the second app for the other side.
3. Can I create multiple desktops on Mac?
Yes, open Mission Control, click the plus icon in the Spaces bar, and move windows into separate desktops.
4. Is Stage Manager better than Mission Control?
Stage Manager is better for active task groups, while Mission Control is better for viewing and finding all open windows.
Final Take: Your Desktop Called. It Wants Boundaries.
Learning how to organize multiple windows on Mac is less about memorizing features and more about building a system. Use snapping for quick layouts, Split View for two-app focus, Mission Control for visibility, Spaces for project separation, and Stage Manager for task groups.
Start with one change today. Create three Spaces: communication, work, and files. Your Mac will feel calmer before your coffee gets cold.