How To Arrange Windows On Mac For Productivity Fast
If your Mac screen feels crowded, the problem is not always too many apps. Most of the time, the real problem is poor window placement. I noticed this while writing, researching, checking email, and switching between browser tabs all day. Once I learned how to arrange windows on Mac for productivity, my work felt faster because I stopped hunting for the right window every few minutes.
The goal is simple. Keep the window you are actively using in the center of your attention, place supporting apps nearby, and move distractions out of the way. macOS already gives you several built-in tools for this, including window tiling, Spaces, Mission Control, Split View, and Stage Manager. A good setup can also include a dedicated window manager if you want faster shortcuts and custom layouts.
Why Window Arrangement Matters More Than App Count
I used to think productivity meant closing every app except the one I needed. That rarely worked. I would close Mail, reopen it five minutes later, hide Safari, search for it again, then lose my notes behind another document.
A better approach is to arrange windows by job. When I write, I need a document, a browser, and maybe a notes app. When I plan content, I need a spreadsheet, a brief, and a calendar. When I communicate, I need Mail, Slack, or Messages without letting them take over the screen.
This is why window management matters. It reduces visual clutter, cuts unnecessary app switching, and makes your Mac feel calmer. Instead of reacting to whatever window pops up, you design the workspace before the work starts.
Start With Native Mac Window Tiling
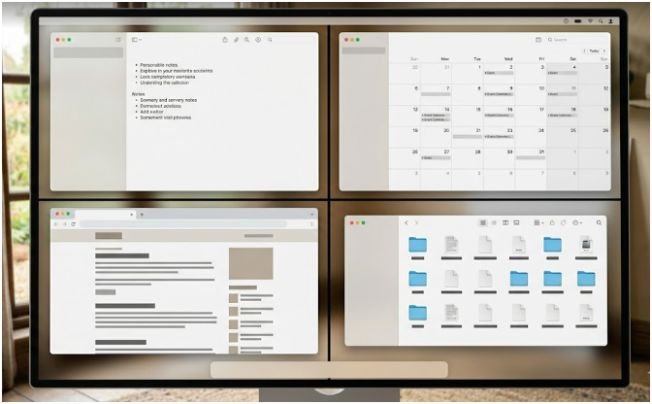
The fastest way to arrange windows on a modern Mac is native window tiling. On newer macOS versions, Apple lets you move windows into halves, corners, and organized layouts without installing anything.
Use Drag-to-Tile for Fast Layouts
The easiest method is dragging a window to the edge of the screen. Move a window to the left or right edge, wait for the highlighted preview, and release it. The window snaps into that half of the display. Drag it to a corner when you want a quarter-screen layout.
I use this for simple two-app workflows. For example, when I am editing a blog, I keep the document on the left and the research page on the right. That layout works better than switching between full-screen apps because both sources stay visible.
You can also hold the Option key while dragging a window toward an edge or corner. This makes tiling feel quicker and more intentional, especially when you do not want to rely on the edge preview.
Use the Green Button Menu for Cleaner Control
The green button in the top-left corner of a Mac window does more than enter full screen. Hover over it, and macOS shows layout options. Depending on your macOS version, you may see options to move, resize, tile, fill, or arrange windows.
I prefer the green button when I want a clean layout without dragging windows around. It feels slower than shortcuts, but it is easier for beginners. It also helps when your trackpad gesture accidentally moves a window too far.
This method works well for pairing apps. You can place Safari on one side and Notes on the other, or put Mail beside Calendar when planning your day.
Learn the Keyboard Shortcuts That Save Clicks
Keyboard shortcuts make Mac window management feel much faster. Apple provides shortcuts for moving and arranging windows, and you can access several tiling commands from the Window menu.
You do not need to memorize every shortcut. Start with the ones you use daily. I recommend learning how to switch apps, cycle through windows in the same app, minimize windows, and move focus between active windows.
For daily productivity, Command + Tab helps switch apps, Command + ` cycles through windows in the same app, and Command + M minimizes the front window. These small habits prevent the desktop from becoming a pile of overlapping windows.
Build Spaces Around Real Workflows
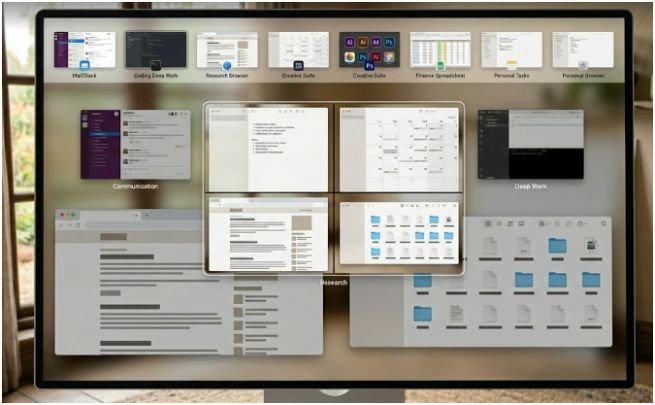
Spaces are virtual desktops inside Mission Control. They are useful when one desktop is not enough, but you do not want everything stacked together.
Open Mission Control by swiping up with three or four fingers on the trackpad, pressing the Mission Control key, or using Control + Up Arrow. Move your pointer to the top of the screen and click the plus button to add a new desktop space.
My Three-Space Productivity Layout
The most useful setup I have tested is a three-space system.
My first Space is for communication. I keep Mail, Slack, Messages, and Calendar there. I do not want these apps mixed with writing or research because notifications pull my attention away.
My second Space is for deep work. This is where I keep my main writing app, document editor, spreadsheet, or design tool. I keep this space as clean as possible.
My third Space is for reference. This includes Safari, research pages, PDFs, competitor pages, or source documents. When I need information, I swipe to this space instead of burying my main writing window.
This setup gives each task a home. It also reduces the mental load of deciding where every window should go.
Use Stage Manager When You Need Focus
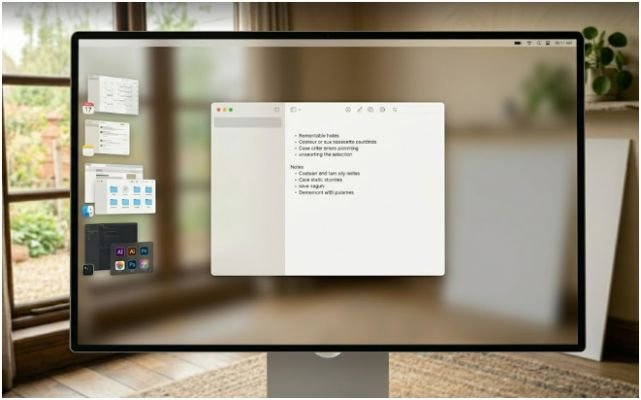
Stage Manager is useful when your desktop feels noisy but full-screen mode feels too restrictive. When you turn it on from Control Center, your active app stays in the center, while other apps sit along the side for quick access.
I find Stage Manager helpful during review work. For example, when I am checking a final draft, I keep the document active and leave reference apps tucked to the side. I can switch quickly without letting every window compete for attention.
Stage Manager is not perfect for every workflow. If you need three or four windows visible at once, tiling or a window manager works better. But for single-task focus, it gives your Mac a cleaner working rhythm.
When Built-In Tools Are Not Enough
Native macOS tools are good for basic layouts. But if you arrange windows many times a day, third-party apps can save more time. This is where tools like Rectangle, Magnet, Moom, Raycast, and GridSutra become useful.
Choosing the best window management app for Mac
The best window management app for Mac depends on how you work. If you want simple snapping and keyboard shortcuts, Rectangle is a popular choice. If you want a polished paid tool for snapping windows into halves, thirds, and corners, Magnet is another common option. If you already use keyboard launchers, Raycast includes window management commands that fit a shortcut-heavy workflow.
For users who want more control over repeatable layouts, a tool like GridSutra can be useful because it focuses on arranging and positioning windows in smarter ways. This matters when you regularly use the same app combinations for writing, coding, design, meetings, or research.
Why a Mac window arranging app for productivity helps power users
A Mac window arranging app for productivity becomes valuable when your layout is repeated every day. Manually resizing windows is fine once. Doing it twenty times a day becomes wasted motion.
For example, a content writer might always need a document on the left, browser research on the right, and notes below. A designer might want Figma centered, references on one side, and Slack hidden until needed. A developer might need an editor, terminal, browser preview, and documentation arranged in a repeatable grid.
That is where custom layouts matter. You are not only moving windows. You are creating a workspace pattern your brain can trust.
My Tested Window Layout for a Productive Mac Day
Here is the layout I keep returning to because it works on a MacBook and an external monitor.
For writing, I place the editor in the largest left-side area. I keep Safari or Chrome on the right for research. Notes sits in a smaller window behind the browser, not beside the main draft. That prevents me from constantly reading notes instead of writing.
For planning, I use a three-window layout. Calendar goes on the left, a spreadsheet sits in the center, and the brief or task list stays on the right. This arrangement makes it easier to compare deadlines, topics, and priorities without opening each app repeatedly.
For meetings, I keep the video call centered, notes on the right, and the agenda or client brief on the left. I avoid placing chat apps near the meeting window because they steal attention.
This is the real secret behind how to arrange windows on Mac for productivity. Do not copy someone else’s perfect desktop. Build layouts around the decisions you make most often.
Common Window Arrangement Mistakes to Avoid
The biggest mistake is using full-screen mode for everything. Full screen looks clean, but it often hides useful context. If you need to compare information, tiling works better.
Another mistake is keeping communication apps on the same desktop as deep work. Even if notifications are silent, visible inboxes create pressure. Move them to a separate Space.
The third mistake is using too many tiny windows. Four-window layouts look productive, but they can become cramped on a smaller MacBook screen. On a laptop, two main windows usually work better. Save four-window grids for larger monitors.
Also, do not install a window manager before learning the built-in tools. Native tiling, Spaces, and Stage Manager may solve most of your problem. Add third-party software only when you know what limitation you are trying to fix.
FAQs
1. What is the easiest way to arrange windows on Mac?
The easiest way is to drag windows to the screen edge for tiling or use the green button menu for layout options.
2. How do I split my Mac screen for productivity?
Use window tiling or Split View to place two apps side by side, such as Safari and Notes.
3. Is Stage Manager better than Spaces on Mac?
Stage Manager is better for single-task focus, while Spaces are better for separating full workflows.
4. Do I need a Mac window arranging app for productivity?
You need one only if you want faster shortcuts, custom layouts, or repeated window setups.
Final Take: Your Mac Desk Deserves Better Manners
A messy Mac screen does not mean you are disorganized. It usually means your windows have no rules. Start with native tiling, create a few Spaces, use Stage Manager for focus, and add a window manager only when you need more speed.
The best setup is the one you can repeat without thinking. Once your windows know where to live, your brain gets more room to work.