MacBook window snapping tool: Best Setup for Less Drag
A messy MacBook screen can make simple work feel slow. The right MacBook window snapping tool helps you stop dragging corners, guessing window sizes, and losing apps behind each other.
I use window snapping differently on a MacBook than I do on a large monitor. On a laptop screen, more zones do not always mean more productivity. The goal is not to pack six apps onto one display. The goal is to keep two useful windows readable, reachable, and easy to switch.
Why MacBook Window Snapping Feels Different
A MacBook screen has limited space, even when the display looks sharp. That is why advice made for ultrawide monitors often feels wrong on a laptop. A layout with thirds, quarters, or sixths may look efficient in a screenshot, but it can make text, sidebars, and browser tabs painfully small.
The Small-Screen Problem Most Guides Ignore
Many window snapping tools promote advanced layouts. They can split your screen into left thirds, right thirds, quarters, top halves, bottom halves, and custom grids. Those features are useful on external monitors. On a MacBook’s built-in screen, they often create clutter.
For most laptop work, I find three layouts more useful: left and right halves, one full-screen app, or fast switching between apps. Those layouts keep the workspace clean without shrinking every window into a tiny box.
My Simple Rule For MacBook Layouts
My rule is simple: if I have to zoom in after snapping a window, the layout failed.
A good MacBook window snapping tool should make the screen easier to read. It should not turn a 14-inch display into a puzzle. Halves work well for writing beside research, email beside calendar, or Slack beside a browser. Quarters only make sense for light reference windows, not deep work.
Native macOS Snapping: Enough For Most MacBook Users?
macOS now includes native window tiling, so you may not need a third-party app at all. If your workflow is basic, Apple’s built-in tools can handle the most common layouts without extra software.
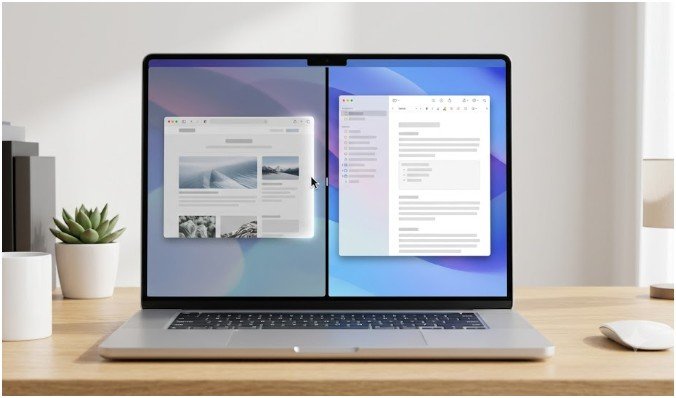
Drag To Snap On macOS
The easiest method is dragging a window to the screen edge. Drag it left or right to tile it into half the screen. Drag it toward a corner to place it into a quarter. Drag it to the top to fill the screen.
This feels familiar if you have used Windows snapping before. It also works well with the MacBook trackpad because you can move windows naturally without memorizing shortcuts.
Use The Green Button Menu
You can also hover over the green button in the top-left corner of a window. macOS shows tiling options such as filling the screen, centering a window, or placing it to one side.
This is useful when dragging feels clumsy. I like it for apps that have narrow title bars or windows that are hard to grab quickly.
Turn Off Window Margins For A Cleaner Fit
By default, tiled windows may leave a small gap between them. Some people like that breathing room. I usually prefer the cleaner look.
You can change this in System Settings under Desktop & Dock. In the Windows section, turn off tiled window margins if you want windows to sit closer together. This small change makes a MacBook screen feel less wasted.
When A Third-Party MacBook Window Snapping Tool Makes Sense
Native snapping is good for simple layouts. A dedicated MacBook window snapping tool makes sense when you want faster shortcuts, custom zones, or repeatable layouts.
This matters if you switch between the same apps every day. For example, you may want Safari on the left, Notes on the right, and Messages hidden until needed. A tool with shortcuts can save dozens of small resizing movements each day.
Rectangle For Free Keyboard Shortcuts
Rectangle is a popular free and open-source option. It supports keyboard shortcuts and snap areas, which makes it ideal if you want more control without paying.
I would choose Rectangle if you want practical snapping on a budget. It is especially helpful if you prefer keyboard commands for left half, right half, maximize, center, and restore.
Magnet For A Polished App Store Option
Magnet is a paid Mac App Store option with a clean, simple setup. It offers window positions, keyboard shortcuts, trigger areas, and more layout choices than macOS provides by default.
I would choose Magnet if you want something polished that works without much configuration. It is a strong fit for users who want better snapping but do not want to spend time building custom rules.
BetterSnapTool For Custom Zones
BetterSnapTool is better for custom snap areas. It lets you create specific zones and window behaviors, which can help if your workflow is unusual.
On a MacBook screen, I would use this carefully. Custom zones are powerful, but too many zones can become visual noise. It works best when you create only two or three zones you use every day.
Best Layouts For A MacBook Screen
The best snapping setup depends on what you do most. A student, writer, developer, designer, and remote worker will not use the same layout. Still, a few patterns work well for most MacBook users.
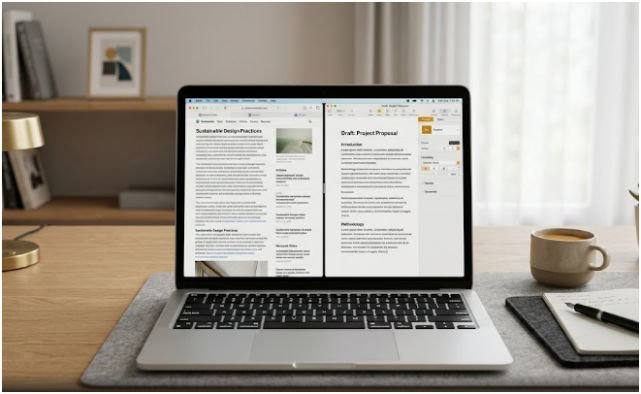
Two-App Work Mode
This is the layout I use most. Put the active task on one side and the reference app on the other.
For writing, I keep the document on one side and research on the other. For planning, I use calendar beside email. For meetings, I keep notes beside the video call.
This layout avoids the biggest MacBook problem: constant switching. It gives you just enough context without crowding the screen.
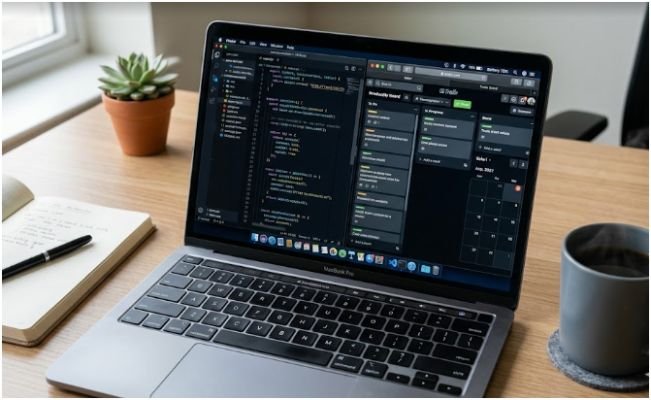
Full-Screen Focus Mode
Some tasks deserve the whole display. Editing a document, reviewing a spreadsheet, writing code, or working in a design app often feels better full screen.
A snapping tool should not force every task into split view. Sometimes the most productive layout is one app, centered attention, and no distractions.
Quick-Switch Mode
Quick switching is underrated. On a small screen, switching between clean full-size windows can beat squeezing everything side by side.
Use Command-Tab for apps, Mission Control for open windows, and App Exposé when one app has multiple windows. This setup works well when your apps need space, but you still want fast movement.
How To Choose The Right Setup
Do not pick a tool because it has the longest feature list. Pick one based on how your hands work during the day.
Pick Dragging If You Use The Trackpad
If you already use the trackpad for most actions, native macOS snapping may be enough. Dragging windows to the left, right, top, or corners feels natural. You also avoid another app running in the background.
This is the best low-friction setup for casual users.
Pick Shortcuts If You Hate Repeating Movements
If you resize windows many times a day, shortcuts are worth it. Keyboard snapping removes repeated dragging. It also helps when your MacBook is connected to an external keyboard.
A third-party MacBook window snapping tool becomes more useful when your workday includes repeated app pairings.
Avoid Overbuilding Tiny Grids
Thirds and sixths sound powerful, but they are not always practical on a MacBook. I only recommend thirds on a 16-inch MacBook or when one window is used for light reference.
For 13-inch and 14-inch screens, halves and full-screen layouts are usually better. They keep text readable and reduce eye strain.
My Tested MacBook Snapping Workflow
Here is the workflow I would recommend for most MacBook users.
First, try native macOS snapping for one week. Use left and right halves for two-app work. Use full screen for focus tasks. Turn off tiled margins if the gaps bother you.
Second, notice where friction appears. If you keep dragging windows into the same positions, install a shortcut-based tool. Rectangle is a good free starting point. Magnet is better if you want a smoother paid option.
Third, keep your layout rules simple. Create one writing layout, one meeting layout, and one planning layout. That is enough for most people.
For example, my writing setup is simple: browser on the left, editor on the right. My meeting setup is video call on one side, notes on the other. My planning setup is calendar beside task manager. I do not use six zones because I do not want six tiny distractions.
This is also where an internal workflow can help. If you are tired of dragging and resizing the same apps daily, learn to stop manually resizing windows on Mac.
FAQs About MacBook Window Snapping Tools
1. What is the best MacBook window snapping tool for beginners?
Native macOS snapping is best for beginners because it handles halves, quarters, and full-screen layouts without installing another app.
2. Is Rectangle better than macOS window snapping?
Rectangle is better if you want more keyboard shortcuts, repeated layouts, and faster resizing than the native macOS tiling tools.
3. Do I need a window snapping app on a MacBook?
You only need one if you resize windows often or want custom shortcuts beyond Apple’s built-in snapping options.
4. What layout works best on a MacBook screen?
A two-window half-screen layout works best for most MacBook users because it balances space, readability, and multitasking.
Final Take: Stop Wrestling Your Windows
A MacBook window snapping tool should make your laptop feel calmer, not busier. Native macOS snapping is enough if you only need clean halves and full-screen focus. Rectangle, Magnet, and BetterSnapTool make sense when you want faster shortcuts, repeatable layouts, or custom zones.
My sassy rule: if your “productivity setup” makes you squint, it is not productivity. Start with two readable windows, keep your layouts simple, and only upgrade when your hands keep doing the same resizing work every day.