How To Split Screen On Mac And Master Window Management Like A Pro

A crowded desktop filled with browser tabs, documents, and apps can quickly become overwhelming. Learning how to split screen on a mac was one of the easiest productivity upgrades I discovered because it made multitasking feel effortless. Instead of constantly switching between windows, you can keep important apps visible side by side and stay focused on what matters most.
Key Takeaways
- Split Screen helps you work with two apps side by side without constant window switching.
- Mac offers multiple ways to manage windows, including Split View and Mission Control.
- Window management tools can provide more flexibility than native macOS features.
- Keyboard shortcuts and Spaces improve multitasking efficiency.
- Learning how to split screen on mac can significantly boost productivity and organization.
Mac Users Love Split Screen Features
Multitasking has become part of everyday life. Whether you’re attending virtual meetings, comparing spreadsheets, researching information, or writing content, switching between windows repeatedly can slow you down.
That is why learning how to split screens on mac is so useful. It keeps two applications visible at the same time, helping you stay productive without losing track of your work. Think of it as giving your screen a simple productivity makeover.
A Smarter Way To Work
Instead of minimizing and reopening windows all day, Split Screen keeps everything accessible. This creates a smoother workflow and reduces distractions.
Perfect For Daily Tasks
Students, professionals, designers, and remote workers can all benefit from viewing multiple applications simultaneously. It makes everyday tasks faster and more organized.
How To Split Screen On Mac Using Split View
The easiest way to split your screen is through Apple’s built-in Split View feature.
Using The Green Traffic Light Button

To begin, open the first application you want to use. Move your mouse cursor over the green full-screen button located in the upper-left corner of the window. You can also click and hold the button if hovering does not display the menu.
A drop-down menu will appear. Select either “Tile Window to Left of Screen” or “Tile Window to Right of Screen” depending on where you want the application positioned. The selected app will immediately snap into place on one side of the display.
Choose Your Second App
After the first window is positioned, the remaining area of the screen will display your other open applications. Simply click the second app you want to use.
macOS will automatically place it on the opposite side, creating a clean side-by-side workspace. This is the fastest method for anyone learning how to split screen on mac for the first time.
Enjoy Distraction-Free Multitasking
Once both windows are active, you can work between them without needing to constantly switch tabs or move applications around. This setup is especially useful for research, content creation, note-taking, and project management.
Use Mission Control For Greater Flexibility
Split View is not the only way to manage windows on macOS.
Open Mission Control
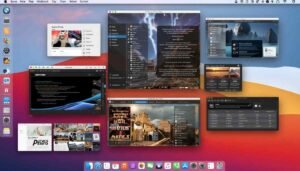
Mission Control provides a bird’s-eye view of every active window, desktop, and workspace on your Mac. To access it, swipe upward with three or four fingers on your trackpad or press the Mission Control key, typically F3. This feature gives you complete visibility into your current workspace and makes window organization much easier.
Create A New Workspace
Once inside Mission Control, drag an open window toward the top of the screen. This creates a new Space where the application can operate independently from your main desktop.
Using multiple Spaces helps reduce clutter and allows you to separate projects or workflows more effectively.
Combine Apps Into Split View
To create a Split View arrangement through Mission Control, drag a second application directly onto the thumbnail of the first app at the top of the screen.
The two apps will merge into a dedicated Split View workspace, providing another efficient way to manage windows on macOS.
Customize Your Split Screen Experience
The real power of Split View comes from its flexibility.
Resize The Windows
Not every application requires equal screen space. Click and drag the black vertical divider between both windows to adjust their size.
This allows you to give more room to a spreadsheet, document, browser, or presentation depending on your needs. Double-clicking the divider usually restores a balanced layout.
Switch App Positions
Sometimes the layout feels more natural when apps are placed on opposite sides of the screen. Simply click and hold the title bar of one application and drag it across to the other side. This quick adjustment helps create a workspace that matches your preferred workflow.
Stay Organized
Small layout adjustments can make a noticeable difference in productivity. Taking a few seconds to customize window placement often results in a more comfortable and efficient work environment.
How To Exit Split View On Mac
Eventually, you may want to return to a standard desktop layout.
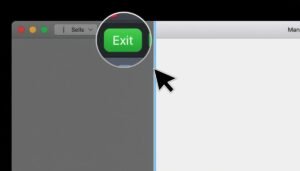
Reveal The Window Controls
Move your cursor toward the top of the screen. The app controls will appear automatically, including the green button used to activate Split View.
This button may display two overlapping rectangles instead of the standard full-screen icon.
Return To Normal View
Click the green button on either application. The selected app will exit Split View and return to a regular window.
The second application may remain full screen or return to its previous state depending on your macOS version and settings.
Continue Working Normally
After exiting Split View, you can resize, reposition, or organize windows however you like. The transition back to a standard desktop is seamless and takes only a few seconds.
Boost Window Management Beyond Split Screen
While Split View works well for many situations, advanced users often want more control.
Explore Multiple Desktops
macOS Spaces allow you to create separate desktops for different projects. One desktop can be dedicated to communication apps, while another focuses on research or creative work. This approach keeps your workflow organized and prevents screen clutter.
Try Window Snapping Tools
Applications such as Rectangle and Magnet offer advanced window snapping features similar to Windows Snap Layouts. These tools make arranging multiple windows faster and more precise. For users who frequently multitask, they can significantly improve your productivity.
Combine Techniques
The best window management strategy often combines Split View, Mission Control, Spaces, and keyboard shortcuts. Together, these tools create a highly efficient workspace.
Common Problems And Quick Fixes
Even though Split View is easy to use, occasional issues can occur.
Split View Option Missing
If the tiling options do not appear when hovering over the green button, try clicking and holding it instead. Some macOS versions behave differently.
App Won’t Enter Split View
Certain applications do not fully support Split View functionality. In these situations, manually resizing windows can provide a similar experience.
Feature Suddenly Stops Working
Restarting the application, checking display settings, or updating macOS usually resolves most Split View problems. A quick system restart can often help as well.
Frequently Asked Questions
1. How do I split my screen into two screens on Mac?
To learn how to split screen on a Mac, hover over the green full-screen button, select a left or right tile option, and then choose a second application to occupy the remaining space.
2. What is the shortcut for split screen on Mac?
macOS does not include a dedicated default keyboard shortcut for Split View. Most users access it through the green window button or use third-party window management applications.
3. How to view 2 pages side by side in Mac?
Open both pages in separate windows, then use Split View or manually resize each window. This allows both pages to remain visible simultaneously for easier comparison.
4. Why can’t I split screen anymore on Mac?
If Split View is not working, the app may not support the feature, your system settings may need adjustment, or a macOS update may be required to restore functionality.
Split The Screen, Multiply The Productivity
Once you understand how to split screen on mac, multitasking becomes faster, smoother, and far less frustrating. Whether you use the green traffic light button, Mission Control, multiple Spaces, or advanced window management tools, several hidden macOS features offers several ways to create an organized workspace.
Start using how to split screen on mac regularly, and you’ll quickly notice how much easier it becomes to manage tasks, stay focused, and work more efficiently throughout the day.